Collecting Autumn Leaves
A note from Tasha: I live in Alberta. Autumn is very short here. Ms. Spooner is my Grade Two teacher. She went to Montreal, Quebec and brought back maple leaves for everyone in the class.
I asked my mom if we could do something special with the leaves. She was working on a leaf collector album for her website. She agreed to put it in my website instead. We had a lot of fun filling it out and collecting a lot of leaves.
 Note: The templates are found at the bottom of this
page.
Note: The templates are found at the bottom of this
page.
Tasha had a lot of fun working on the leaf collector album (Laurie from Indiana had originally suggested it -- thanks Laurie!). I'd originally intended to put it on the DLTK's site, but she enjoyed it so much we put it on her KidZone site instead.
I've found that since the middle of grade one, Tasha has enjoyed collecting everything from rocks to beanie babies. The leaf album was the perfect project for her.
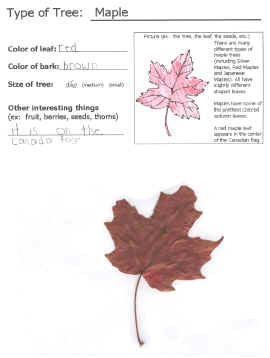
You'll notice that we've included templates for common groups of trees (maple, poplar, birch, oak, etc), but have not split into "species" of tree. So -- the maple template would be used for the Sugar Maple, the Silver Maple, etc. If your children are more advanced collectors, they can fill in the species in the "Type of Tree" line
For early grade school children, just figuring out which is a maple leaf and which is an ash leaf is likely challenging enough.
Directions:
- Print the templates, punch holes in them and put them in a binder (or just staple the corner)
- We've included a blank sheet for trees without templates and plants with pretty leaves (we ended up doing Virginia Creeper leaves and Geranium leaves because they had nice colors)
- Wander around outside and collect various
leaves.
- Take a small notebook or scrap paper to jot down notes about the bark, berries, seeds, etc. That go with the leaves.
- Put the leaf and the notepaper in a baggie to keep them together.
- Or you can take a binder with the template sheets in it -- I found Tasha preferred to jot quickly on scrap paper and return home to do her best job printing on the template.
How to display the leaves on the templates:
There are a number of ways to put the leaves onto the templates:
- Leaf rubbings:
- Put the leaf underneath of the template so the rough (back) of the leaf is facing up
- Take a crayon and peel off the paper
- Lie the crayon on its side and rub it over the template
- This is a nice project for Age 3-4
- Pressed leaves:
- Press the leaves in a big book (phone books work well) between sheets of wax paper for a couple of days.
- Cut pieces of wax paper or clear contact paper (you can purchase at an office supply store).
- If using wax paper, the pieces should be about 8"
x 8".
- Fold the wax paper in half once (you now have a piece 8"x4")
- Fold the open edges of the wax paper in about 1/4 inch and crease well (you now have an "envelope" that is about 7.5"x4")
- Slide the pressed leaf inside the envelope.
- Fold the top open edge down about 1/4 inch and crease well.
- Put the envelope onto the template and scotch tape the corners.
- If using clear contact paper (this is what we used),
the pieces should be about 7" x 4".
- Peel the backing off the contact paper
- Put the leaf onto the template in the position you want it shown
- Carefully put the contact paper overtop, smoothing out any bubbles with your fingers.
Templates:
Blank (Mystery) Leaves (color) or (B&W)
Ash Leaves (color) or (B&W)
Birch Leaves (color) or (B&W)
Elder Leaves (color) or (B&W)
Maple Leaves (color) or (B&W)
Oak Leaves (color) or (B&W)
Poplar Leaves (color) or (B&W)